How to clone a cannabis plant is mostly a question about water. A cutting has no roots, so it cannot replace what it loses through its leaves, and every decision in the first ten days either slows that loss or speeds it up. A grow light is part of that balance, not a separate subject. The right clone light keeps the tray warm without drying the leaves, and the wrong one bleaches a cutting that would have rooted in a dark cupboard.
This guide covers the cut, the rooting environment, the light numbers that work, and the two questions buyers ask most often: what to look for in an LED clone light, and how those fixtures differ from a regular grow light. It also answers whether you can clone a clone, because that question decides how you manage mother stock for years rather than cycles.
The numbers here match our propagation sizing guide, so a small room and a commercial rack can be planned on the same basis. Where a figure is facility practice rather than a research result, we say so.
A weed clone is a cutting taken from a mother plant and rooted on its own. It carries the same genotype as the plant it came from, which means the same genetic code, not the same appearance. Two clones from one mother can still look different in two rooms, because light, temperature, root zone and pruning decide how that code is expressed.
Commercial rooms clone for three reasons. The first is uniformity: a tray of clones flowers on one schedule, so the canopy finishes together and the harvest is one event instead of five. The second is certainty: a mother that has already performed in your room is a known quantity, and seed is not. The third is time: a rooted clone skips germination and the first stretch of seedling growth, which shortens the cycle by one to three weeks depending on how the room is run.
The trade is that clones share weaknesses as well as strengths. If the mother carries a viroid, a root pathogen or mites, every cutting in the tray carries the problem too. That is why propagation is a hygiene job before it is a lighting job.
Prepare everything before a blade touches a stem, because a cutting that sits on a bench while you look for a cube is already losing water. A basic kit is short:
A sharp, sterile blade. A scalpel or a single-edge razor, cleaned with 70 percent isopropyl alcohol between mothers. Scissors crush the stem, and a crushed stem draws air into the xylem, which is one of the reasons cuttings wilt within the hour.
A rooting medium. Four centimetre rockwool cubes, peat plugs or aeroponic collars all work. Rockwool should be soaked and adjusted to about pH 5.5, because the stone wool itself sits near pH 7 and will drift the root zone upward if it is used straight from the bag.
A rooting gel or powder. Most commercial gels carry 0.1 to 0.3 percent IBA. The hormone is not magic, and a healthy cutting will often strike without it, but it widens the margin on cultivars that root slowly.
A tray, a humidity dome and a heat mat. The dome holds humidity for the first days. The mat holds the root zone at 22 to 24 °C, which matters more than air temperature in the first week.
Labels, a tray map and a log. A clone room without records cannot tell a cultivar problem from a room problem, and it cannot answer which mother is worth keeping.
Work from a mother that has been fed and watered normally. A starved mother produces thin stems and slow strikes, and a mother flushed hard before cutting produces soft growth that rots in the cube.
Choose a shoot 10 to 15 centimetres long with three or four nodes and a stem about the thickness of a pencil. Lower and middle shoots are usually stronger than the very top, which is soft and quick to wilt.
Cut about five millimetres below a node at a 45 degree angle. The angle exposes more surface for water uptake, and cutting below a node puts the hormone-rich tissue inside the medium rather than above it. Drop the cutting straight into a cup of clean water as soon as it is cut. A stem left dry on the bench can draw air into the xylem, and an air pocket at the cut face blocks water uptake for the life of the cutting.
Remove the lowest leaf and any growth that would sit inside the cube. Leave two or three leaves at the top. If the leaves are large, cut a third off each blade with clean scissors; that reduces the leaf area that is losing water without removing the growing point.
Dip the stem in gel so the bottom two centimetres are coated, then place it in the cube at a depth of two to three centimetres. If a cultivar strikes slowly for you, a light vertical scrape of the lowest centimetre with a clean blade before dipping gives root primordia more sites to form. Skip it on cuttings that already callus fast, because every wound is also an entry point for rot. Firm the medium gently. A loose cube dries around the stem and an over-compressed cube holds too much water, and both produce the same symptom: a cutting that stands for a week and never calluses.
Label the tray with cultivar, mother number and date, then move it under light. The whole sequence should take under a minute per cutting once the station is set up, and that speed is worth practising before a large batch.
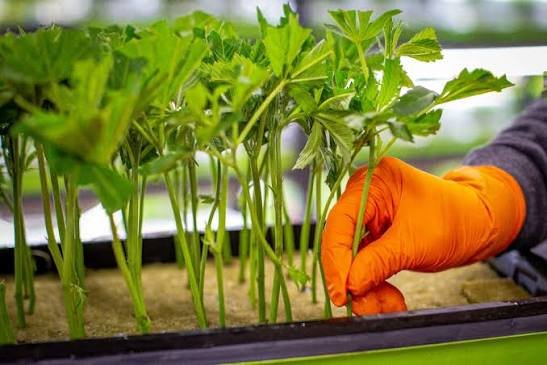
Rooting happens in a narrow band. Below about 20 °C at the root zone, callus forms slowly and the cutting sits in wet medium long enough to rot. Above about 26 °C, pythium and stem rot move faster than the cutting can defend itself. The working band is 22 to 24 °C in the medium, with air at 23 to 25 °C.
Humidity under the dome starts high and comes down. Days one to three sit at 75 to 85 percent relative humidity, which keeps transpiration low while the stem is the only water path. From day three or four, open the vents and step down toward 65 to 70 percent, because a cutting that never meets dry air builds no root system worth transplanting.
Air exchange is the part growers skip. A sealed dome at 85 percent humidity and 24 °C is also a still, warm, wet box, and still air at the stem line is where rot starts. Crack the vents daily, and run a small fan in the room rather than in the dome.
Vapour pressure deficit is the number that ties temperature and humidity together. During rooting it sits around 0.4 to 0.6 kPa. Once roots are visible and the dome comes off, it moves to 0.6 to 0.8 kPa, which is still gentle compared with a flower room at 1.0 to 1.5 kPa.
| Factor | Target | Why it matters |
|---|---|---|
| Air temperature | 23 to 25 °C | Callus and root initiation slow down below 20 °C |
| Medium temperature | 22 to 24 °C | The root zone, not the room, sets rooting speed |
| Humidity under the dome | 75 to 85 percent for days 1 to 3, then 65 to 70 | Keeps transpiration low until roots can replace the water |
| VPD | 0.4 to 0.6 kPa while rooting, 0.6 to 0.8 after transplant | Ties temperature and humidity into one number you can control |
| Media pH | 5.5 to 6.0 | Rockwool sits near pH 7 straight from the bag |
| Media EC | 0.4 to 0.8 | A rich cube burns tissue that has no roots to feed it |
| Photoperiod | 18 hours on, 6 off | The longest day in the building, with no gain from 24/0 |
None of these numbers need a controller to hit, but they do need a thermometer in the medium rather than in the air, and a hygrometer at tray level rather than on the wall. A heat mat with a probe in one cube is enough to catch the failure that matters most, which is a mat running at 30 °C because the sensor is lying on top of it.
Clones need far less light than any other stage in the building. The working band is 100 to 200 µmol/m²/s at the top of the dome, which on an 18 hour photoperiod is a daily light integral of roughly 6.5 to 13 mol/m²/day, and the practical target sits at 8 to 10 mol. Our stage table carries the 100 to 200 µmol band for cuttings, and the mother room sizing guide works from the same figure.
That is about a tenth of what a flowering canopy receives. The reason is not that clones dislike light. It is that a cutting without roots cannot use much light, and the light it cannot use still drives water loss.
Distance depends on the fixture. A low-output propagation bar runs 30 to 60 centimetres above the dome. A full-power flower bar dimmed to its floor may need 80 centimetres or more, and it may still be uneven across a tray. Measure at the top of the dome with a PAR meter, not at the lamp, and measure the corners of the tray as well as the centre. A tray at 150 µmol in the middle and 80 at the edges roots unevenly, and the uneven trays are the ones that get blamed on the cultivar.
Eighteen hours on and six off is the default. A 24 hour photoperiod is common in commercial propagation, and it does not reliably shorten rooting on most cultivars, while it uses a third more energy than 18/6 and removes the dark period that lets the cutting recover from transpiration. If a room runs 24/0 for labour reasons, that is a scheduling decision, not a rooting advantage.
The instinct that more light means faster rooting comes from the flowering room, where yield tracks photons. A cutting is a different problem. It has no root hairs, so water uptake is limited to the cut surface and the stem, while light drives transpiration through whatever leaf area is left. Push the light up and the cutting loses water faster than it can replace it, which is why an over-lit tray wilts at midday and recovers overnight, then wilts again the next day and never calluses.
The energy for the first roots comes from carbohydrates stored in the stem, not from photosynthesis in the first days. A cutting with a pencil-thick stem and healthy reserves will root under modest light. A thin, soft cutting under strong light will spend its reserves staying upright.
The visible signs of too much light at rooting are specific. Leaves cup upward and look pale rather than yellow. Stems take on a purple or red tint that is not cold-induced. The cube dries from the top between waterings faster than the tray next to it. Callus, when it appears, is late and thin. None of these look dramatic, which is why rooms run at 400 µmol for a month and conclude that the cultivar roots slowly.
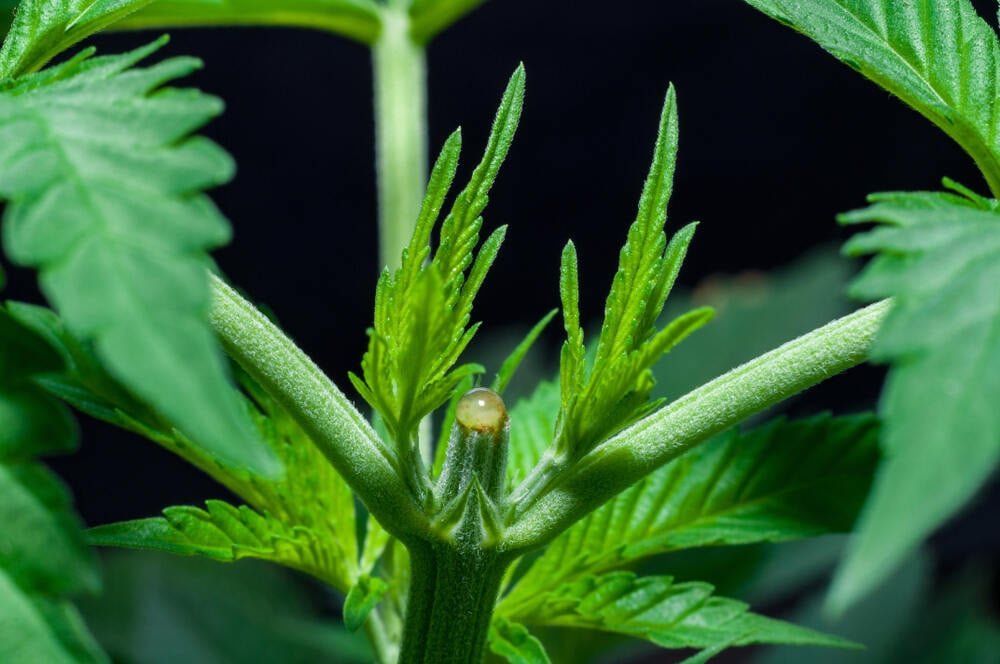
An LED clone light is a low-output, wide-spread fixture built to sit close to a tray. The specification that matters is not the wattage on the label, because a 300 W bar dimmed to 8 percent is being asked to do a job it was not designed for. Look for these seven things in order.
Output you can turn down, not up. A propagation fixture should reach 100 to 200 µmol/m²/s at 40 to 60 centimetres with headroom left, and it should dim to 10 percent or lower without flicker or colour shift. Dimming efficiency drops at the bottom of the range on most drivers, so a fixture that only reaches its band at 5 percent is running inefficiently all day.
A blue-rich white spectrum. A 4,000 to 5,000 K white with a healthy blue share keeps internodes shorter, which matters when 200 cuttings share a shelf and every centimetre of stretch is a transplant problem. There is no rooting case for UV or far-red in a propagation tray, and a channel you do not need is a channel somebody will run at the wrong time.
Uniformity across the tray, not output at the centre. Ask for a PPFD map at the intended mounting height, and treat a variation above 15 percent across the tray as a design problem. Uniform trays root evenly, and even rooting is what makes a transplant day predictable.
Heat that leaves the canopy. A remote driver or a bar with the driver on the far side of the extrusion keeps heat out of a dome that is already at 80 percent humidity. A 100 W fixture still adds about 341 BTU per hour to the room, so the load is real even when the fixture is small.
An IP rating that matches the room. IP54 is a reasonable floor for a dry propagation room. A wet room with misting, drainage and washdown needs IP65 and cable glands rated for the environment, and the driver should never sit on the floor of a wet room.
A form factor that fits a rack. Bars and tubes at 1.2 metres cover a standard rack shelf with fewer fixtures than a square panel, and a slim profile leaves room for the dome. On multi-tier racks, the distance from the fixture to the shelf above is the limit, so a low-profile bar buys a tier.
Controls that match the building. A 0 to 10 V input or a digital bus, plus a timer that can hold 18/6 without drift. Propagation rooms run the longest photoperiod in the building, so a timer that loses two minutes a week is a real error over a cycle.
| Specification | Target | Why it matters at a tray |
|---|---|---|
| PPFD at the dome | 100 to 200 µmol/m²/s | Above the band the cutting loses water faster than it takes it up |
| Daily light integral | 8 to 10 mol/m²/day | The practical middle of the 6.5 to 13 mol range on 18 hours |
| Dimming floor | 10 percent or lower | A close-mounted bar has to run low without a colour shift |
| Spectrum | 4,000 to 5,000 K white with a blue share | Keeps internodes short on a shared shelf |
| Uniformity | Within 15 percent across the tray | Even trays transplant as one batch, not three |
| Efficacy | 2.4 µmol/J or better | Less heat per photon in the warmest, wettest room |
| Ingress protection | IP54 dry room, IP65 wet room | Propagation is the wettest space in the building |
| Mounting height | 30 to 60 cm above the dome | Close range under a low ceiling or a rack shelf |
| Controls | 0 to 10 V or a digital bus, drift-free timer | 18/6 is the longest schedule in the building |
A regular grow light is designed to deliver a high photon flux from a distance. A clone light is designed to deliver a low flux evenly from close range. That difference shows up in six places, and the table below compares them on the terms that decide a purchase.
The output range is the first difference. A flower bar produces 1,700 to 3,000 µmol/s and is mounted 60 to 150 centimetres above the canopy. A propagation bar produces 300 to 600 µmol/s and is mounted 30 to 60 centimetres above a dome. Putting the flower bar over a tray and dimming it to 8 percent means running a large driver far below its efficient range, and paying for output the room will never use.
The spectrum is the second. Flower fixtures lean red to move photons per watt and to shape morphology at the end of the cycle. Propagation fixtures lean white and blue, because the job is compact growth and a readable canopy, not weight.
Dimming floor, heat, IP rating and form factor follow from the same logic. A propagation room is the wettest, tightest, lowest-ceiling space in a facility, and a fixture designed for a 1.5 metre mounting height does not fit it well. That is why a room built from spare flower bars usually ends up with a PAR meter taped to a shelf and a schedule nobody trusts.
| Parameter | Clone light | Regular grow light |
|---|---|---|
| Photon flux | 300 to 600 µmol/s | 1,700 to 3,000 µmol/s |
| Mounting height | 30 to 60 cm above the dome | 60 to 150 cm above the canopy |
| Spectrum | White, 4,000 to 5,000 K, blue share | Red-leaning white, or red plus blue |
| Dimming floor | 10 percent or lower | 20 to 40 percent on many drivers |
| Form factor | Slim bar or tube, rack friendly | Wide bar or panel |
| Heat at the canopy | Low, driver remote | Higher, driver often onboard |
| Ingress protection | IP54 to IP65 | IP20 to IP65 depending on the model |
| Price per micromole | Higher | Lower |
Yes, you can clone a clone, and the genetics survive the process. DNA replication does not wear out through repeated cuttings, and a cutting taken today roots and grows exactly like one taken five generations ago. Deep sequencing of a single mother plant has shown that somatic mutations do accumulate unevenly across the plant, with the top growth carrying more unique variants than the bottom, so a cutting is not a perfect archive of the mother's genome. That mutation load builds slowly, and it has not been shown to explain the decline growers notice within a few seasons. What degrades fastest is the health of the stock, and that is a different problem with a different fix.
Three things accumulate in a clone line that is propagated for years. Pathogens are the first: hop latent viroid, pythium and mites all pass from mother to cutting, and a line that is reinfected every cycle declines in vigour without any genetic change. Age is the second: a mother kept for years under heavy pruning produces thinner, woodier shoots with less stored carbohydrate, and those cuttings root more slowly. Record loss is the third: after several generations nobody remembers which mother produced the best batch, so selection stops happening.
The practical answer is to treat clones as copies of a mother, not as a chain. Keep a small bank of mothers, label them, and replace a mother from a tested cutting rather than from the oldest plant in the room. Take propagation wood from the lower and middle shoots, where the tissue is juvenile and the accumulated mutation load is lowest. Refresh the line from seed or tissue culture every 12 to 24 months, or every 6 to 12 months in a high-turnover room that re-clones the same mothers every cycle. Keep two lines so one bad test does not end a cultivar, and test for viroid before a line goes into a production tray. A grower who does that can clone a clone for a decade without the decline people describe.
| What carries | Preserved | At risk | Action |
|---|---|---|---|
| Genetics | Identical genotype | Nothing through copying | Keep the line; a restart is not needed for genetics |
| Pathogens | Nothing | Viroid, pythium and mites accumulate | Test mothers, start trays from tested stock |
| Vigour | Early generations | Old woody mothers root more slowly | Replace mothers from young, vigorous cuttings |
| Records | Nothing | Which mother produced which batch | Label mothers and trays, keep a written log |
| Long-term supply | Two clean lines | One failed test ends a cultivar | Refresh from seed or tissue culture every 12 to 24 months |
Roots usually appear at the edge of the cube between day 7 and day 14 at 22 to 24 °C. Some cultivars show tips on day 5 and some take three weeks, which is why the calendar is a guide and the cube is the evidence. Transplant when roots are 2 to 4 centimetres long with at least three tips, not when the first white tip appears. A cutting moved at one tip stalls for a week in the next room.
The first week after transplant is a light ramp, not a step. Move from 150 to about 300 µmol/m²/s over three days, then to 400 to 450 by day seven, watching for leaf angle and colour rather than following the number blindly. Hold relative humidity near 65 to 70 percent and VPD at 0.6 to 0.8 kPa, and start feed at 0.6 to 1.0 EC once roots are working.
The dome comes off in stages. Open the vents fully for a day, then lift one edge for a day, then remove it. A dome pulled in one move on a dry day costs more cuttings than any lighting mistake in this guide.
| Day | Light | Humidity and dome | Action |
|---|---|---|---|
| Day 0 | 100 to 150 µmol/m²/s | Dome closed, near 80 percent | Cut, gel, cube, label, mat on |
| Day 1 to 3 | Same | Dome closed, vents cracked once a day | Check cube weight, not just the surface |
| Day 4 to 6 | 150 to 200 | Vents open, 70 to 75 percent | Callus should be visible |
| Day 7 to 10 | 150 to 200 | 65 to 70 percent | Roots at the cube edge |
| Day 10 to 14 | 200 | Dome lifted in stages | Transplant at 2 to 4 cm with three tips |
| Week 3 | 300 to 450 | Dome off, 65 to 70 percent | Light ramp complete, feed at 0.6 to 1.0 EC |
Most clone failures are visible within 72 hours, and most of them are environmental rather than genetic. The table below matches the symptom to the cause that is most often found in a real room, with the fix that costs the least to try first.
One failure deserves a note of its own. Cuttings that yellow from the bottom leaf upward at day 7 to 10 are usually fine: the cutting is mobilising nitrogen from old leaves to build roots. Cuttings that yellow heavily at day 3, before any callus, are not fine. That pattern points to a cold root zone or light above the band, and the leaves are the receipt.
| Symptom | Likely cause | First fix |
|---|---|---|
| Wilting within hours of the cut | Light too high, dome removed, or air in the stem | Drop to 100 to 150 µmol, close the dome, recut at 45 degrees |
| Stem rot at the cube line | Over-wet cube, cold medium, still air | Let the cube dry back, hold 22 to 24 °C, open the vents |
| Heavy yellowing before day 5 | Cold root zone or light above the band | Check the medium temperature before anything else |
| Yellowing from the bottom at day 7 to 10 | Normal nitrogen mobilisation into new roots | No change; the cutting is building roots |
| No roots at day 14 | Cold cube, dry cube, old mother, or no gel | Probe in a cube, re-soak, take younger shoots |
| Pale, cupped leaves | Light above 300 µmol/m²/s | Dim to the band and re-measure at the dome |
Twelve checks before a tray goes in, in the order they fail:
Blade sterile, and a second blade ready. Mother fed and pest-free, with the mother number written down. Cube soaked and pH adjusted to 5.5 to 6.0. Gel within date and not dried at the surface. Stem cut at 45 degrees below a node, then straight into gel. Cube firmed, not compressed. Tray labelled with cultivar, mother and date. Medium temperature at 22 to 24 °C with the probe in a cube. Dome on, vents closed for the first 48 hours. PPFD at the dome top measured between 100 and 200 µmol/m²/s, corners included. Photoperiod at 18/6 on a timer that does not drift. A written note of what changed since the last batch, so the next result can be read.
If the room cannot answer the last item, the first eleven will be re-learned every cycle.
Take a 10 to 15 centimetre shoot with three or four nodes from a healthy mother, cut it at 45 degrees five millimetres below a node, dip the stem in rooting gel, and place it two to three centimetres into a moist cube. Keep the medium at 22 to 24 °C, humidity near 80 percent for the first three days, and light at 100 to 200 µmol/m²/s on 18/6. Roots usually show in 7 to 14 days.
A weed clone is a cutting rooted from a mother plant, so it carries the same genotype as that mother. It is not a seedling and it is not a new variety. Clones are used because a tray of them flowers on one schedule, which makes the canopy and the harvest predictable.
Seven to fourteen days at a medium temperature of 22 to 24 °C is typical, with fast cultivars showing tips around day five and slow ones taking three weeks. Temperature, cube moisture and the age of the mother move that window more than any additive.
Yes. Repeated cuttings do not wear out the genetics, because the plant copies its DNA faithfully. Decline in a long propagated line usually comes from accumulated pathogens such as hop latent viroid, from old woody mother stock, or from lost records. Keep tested mothers, replace them from cuttings, and refresh the line from seed or tissue culture every 12 to 24 months.
Look for a fixture that reaches 100 to 200 µmol/m²/s at 40 to 60 centimetres and dims to 10 percent, a 4,000 to 5,000 K white spectrum with a healthy blue share, PPFD variation under 15 percent across the tray, a remote or shielded driver, and an IP rating that matches the room. Skip UV and far-red channels; they add cost and a way to run the tray wrong.
A regular grow light delivers high photon flux from 60 to 150 centimetres and leans red. A clone light delivers low flux evenly from 30 to 60 centimetres and leans white and blue. The clone fixture also dims lower, runs cooler at the canopy and fits a rack shelf, which is why a dimmed flower bar is a poor substitute.
Cuttings work at 100 to 200 µmol/m²/s at the top of the dome. On 18 hours that is roughly 6.5 to 13 mol/m²/day, and 8 to 10 mol is the practical target. Above that band the cutting loses water faster than it can replace it, and rooting slows rather than speeds up.
No. Eighteen hours on and six off is the default and roots cuttings as well as 24/0 on most cultivars. A 24 hour schedule uses a third more energy and removes the dark period, so run it only when labour or room scheduling requires it, not as a rooting technique.
A healthy cutting will often strike without hormone, but a gel or powder with 0.1 to 0.3 percent IBA widens the margin on slow cultivars and on cuttings taken in cool weather. Hormone does not rescue a cold cube, an over-wet cube or a starved mother.
Wilting within hours usually means the light is too high, the dome came off too early, or air entered the stem through a crushed cut. Move the tray to 100 to 150 µmol/m²/s, close the dome, and recut the stem with a clean blade at 45 degrees before re-dipping in gel.
Transplant when roots reach 2 to 4 centimetres with at least three tips, usually day 10 to 14. Ramp light from 150 to 300 µmol/m²/s over three days and to 400 to 450 by day seven, hold VPD at 0.6 to 0.8 kPa, and start feed at 0.6 to 1.0 EC.
Keep the dome closed for the first 48 hours, then crack the vents and step humidity from about 80 percent down to 65 to 70 percent by day five. Remove the dome in stages once roots are visible, not on a fixed date, because a hard removal on a dry day costs more cuttings than the light schedule does.
Send the rack dimensions, trays per week, ceiling height and the cultivar you propagate. We answer with a fixture count, the PPFD map at the dome, and the mounting height that keeps the tray in the 100 to 200 band without a PAR meter taped to a shelf.
