
This page is the timing companion to our guide on why cannabis leaves turn yellow, which works through the diagnostic logic in the other direction: leaf position first, then pattern, then the fourteen-element table, then root-zone pH and EC. That page answers the question what is wrong with this leaf. This page answers a question that comes one step earlier and changes the answer: how old is this plant, and what is normal at that age. Both are needed, and reading them in the wrong order is how growers spend money on fertilizer to fix a light problem, or spend three weeks chasing a fade that was the plant finishing on schedule.
The organising idea is simple. Yellow is a signal that chlorophyll is being withdrawn or was never built. What matters is who ordered the withdrawal. At some stages the plant withdraws chlorophyll deliberately, as part of a programme: seedling cotyledons retiring, cuttings funding root growth, late-flower leaves surrendering nitrogen to the buds. At other stages the withdrawal is forced by a constraint the grower controls: light that arrives too weakly, water that arrives too often, salts that arrive too strongly. The stage tells you which of the two you are looking at, and the two require opposite responses.
The Short Answer: Name the Stage Before You Name the Deficiency
Three questions, asked in this order, resolve most yellowing inside five minutes and without a single measurement. The first is the stage. The second is where the yellow sits on the plant: oldest leaves, newest leaves, or the whole plant at once. The third is the pattern on the leaf itself: uniform, between the veins, along the margin, or in spots.
The stage question earns first place because it removes most of the candidate list before you look at a leaf. In the first three weeks the roots are small enough that almost any feed is a risk, so the answer is nearly always environmental. In the ten days after the flip the light integral changes by a third while the feed usually does not change at all, so the answer is nearly always photoperiod arithmetic. In the last two to three weeks the plant is programmed to fade, so the answer is often no action. The window between weeks four and seven of flower is where a genuine deficiency is the most likely explanation, and it is a narrower window than the internet suggests.
There is a useful asymmetry here. Yellowing that appears uniformly across a whole plant, all at once, within a day or two, is almost never a nutrient deficiency, because a deficiency develops over weeks as a store runs down. Sudden whole-plant yellowing points at the root zone, the water, or the environment. Yellowing that spreads slowly from the oldest leaves upward, over one to three weeks, with a clear pattern, is the signature a deficiency actually makes.
How to Tell Which Stage a Plant Is Actually In
Days since germination are the least reliable stage marker a grower can use, because two cultivars in the same room can differ by ten days at the same calendar age. Morphology is reliable. Count leaf pairs, look at the node spacing, and read the light schedule the room is running.
A seedling runs from emergence to roughly its third or fourth pair of true leaves, which is usually two to three weeks indoors. The cotyledons, the two rounded seed leaves that appear before any serrated leaf, are still attached for part of that window. A cutting runs from the moment it is taken to the moment roots are visible at the cube wall, typically seven to fourteen days. Vegetative growth runs from the fourth leaf pair to the day the timer changes to twelve hours. The stretch runs for the first two to three weeks after that change, and it is recognisable by rapid internode extension rather than by the calendar.
Mid-flower is defined by the buds, not by the week number: it begins when the flower sites stop extending and start filling, which is usually weeks four to seven of the twelve-hour schedule. Late flower is defined by the opposite: the buds are still adding weight, the pistils are darkening, and the trichomes are turning from clear to cloudy. Once you can name the stage from the plant rather than from the calendar, the yellowing question becomes much easier to answer, because each stage has a short list of usual suspects and a much longer list of things that are not worth testing.
| Stage | Window | Default suspect | Check first | First action |
|---|---|---|---|---|
| Seedling | day 1 to 21, cotyledons still attached | root zone: moisture, temperature, EC | cube weight and input EC | hold the feed and warm the root zone |
| Cutting | cut to visible roots, 7 to 14 days | energy deficit, and usually normal | days since the cut, and whether callus has formed | nothing, provided PPFD stays in band |
| Vegetative | fourth leaf pair to the flip | transplant shock, salt build-up, lower-canopy shade | runoff EC against input, then PPFD at leaf height | fix the cause before raising concentration |
| Flip to week 3 | first 10 to 21 days of 12 hours | daily light integral down by a third | DLI before the change against DLI after | raise PPFD at the dimmer, not the feed |
| Mid-flower | weeks 4 to 7, buds filling | potassium, magnesium, calcium, or salinity | runoff EC, and PPFD at the height of the yellow leaf | change the ratio only after measuring |
| Late flower | final 2 to 3 weeks | senescence, which is on schedule | bud volume now against bud volume seven days ago | nothing, and remove nothing attached |
Seedling Yellowing: The First Three Weeks
Two yellow leaves on a three-inch seedling are usually not a problem, and telling which two matters. The cotyledons are a stored food reserve, not a solar panel. They yellow and drop once the first true leaves can support the plant, usually somewhere between day seven and day fourteen above the cube. A seedling whose cotyledons are yellowing while its first true leaves are green and opening is developing normally, and feeding it at that moment is the most common way to turn a healthy seedling into a burned one.
Yellowing on the first true leaves, with a plant that is short and not extending, is a root-zone story. Seedling roots are a few centimetres long and have almost no capacity to buffer salt. A propagation cube that came pre-charged with nutrients, plus a light feed, plus a slightly high EC in the irrigation water is enough to burn the root tips, and the shoot shows it as pale, slightly cupped leaves before it shows anything at the root. The same symptom appears when the cube stays saturated: roots need oxygen as much as water, and a cube that never dries back to half its weight is a cube where roots stop working. Check the cube weight and the input EC before you check the feed chart.
The third pattern is the one most often misdiagnosed. A seedling that stretches, with a long pale stem and leaves that are light green rather than yellow, is short of light, not short of nitrogen. The plant is allocating stem to reach brighter air, and the pale colour is thin chlorophyll rather than withdrawn chlorophyll. Our stage table puts seedlings at 200 to 300 µmol/m²/s on an 18 to 24 hour schedule, a daily integral of 13 to 26 mol, and a seedling held at half that will stretch regardless of how much nitrogen it receives. Adding nitrogen at this point produces a taller, softer, more stretched seedling, which is the opposite of the intended fix.
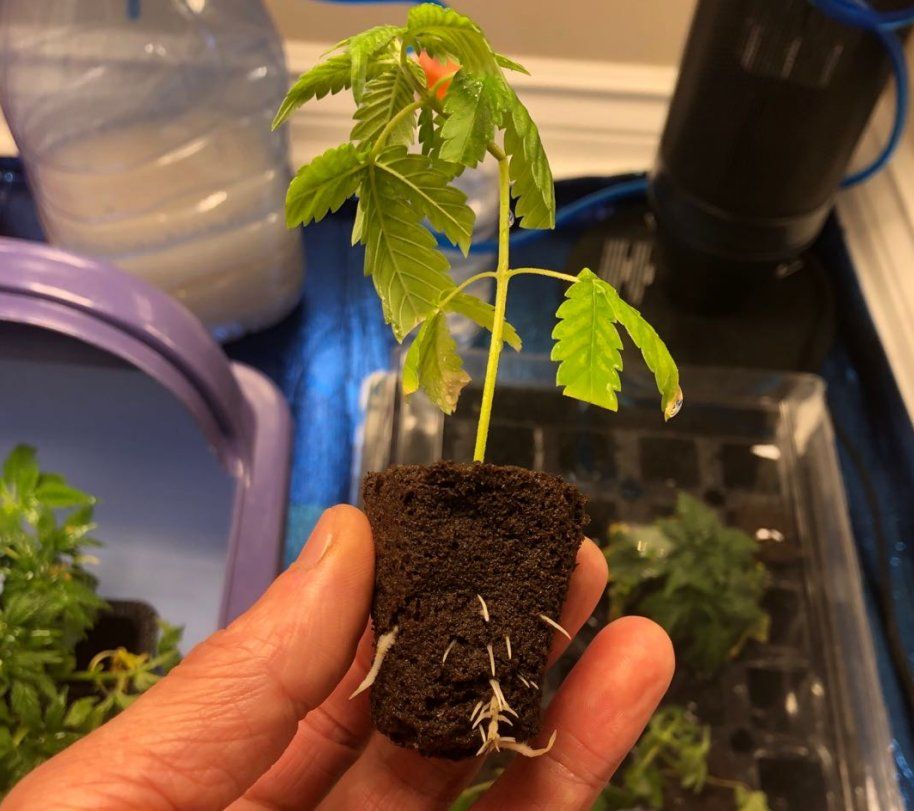
Two environmental details decide most seedling outcomes, and neither is measured by a nutrient pen. Substrate temperature below about 20 °C slows root initiation and produces the same pale look as a deficiency, because a cold root cannot take up what is in the solution. And a dome that stays on after the first true leaves open keeps humidity at a level where transpiration nearly stops, which stalls calcium movement, since calcium travels with the transpiration stream. If the leaves are pale and slightly distorted rather than uniformly yellow, lift the dome and raise the light before opening any bottle.
Clones and Cuttings: Yellow as an Energy Deficit
A cutting has no roots, so it cannot take up anything, yet it continues to transpire and to respire. That gap is funded from stored reserves, and the most mobile reserve is nitrogen in the older leaves. This is why a cutting that yellows from the bottom leaf upward somewhere around day seven to ten is on schedule rather than in trouble: the plant is dismantling its oldest leaf tissue to build a root system. The yellowing stops and reverses within a few days of roots showing.
The timing is what separates normal from abnormal. A cutting that yellows heavily at day three, before any callus has formed at the cut end, is not funding root growth, because there is no root growth yet to fund. That pattern points at the propagation environment: a dome that is too warm, a cube that is too wet, a cut surface that is rotting, or light that is far too strong for a plant with no root. The same appearance at day ten with roots at the cube wall is the expected cost of rooting and needs nothing.
The light band matters more than most growers expect, and it is narrower than the vegetative band. Our stage table carries fresh cuttings at 100 to 200 µmol/m²/s on an 18 hour photoperiod, a daily integral of roughly 6.5 to 13 mol, and the ceiling is real: a tray at 150 µmol in the middle and 80 at the edges roots unevenly, and the uneven trays are the ones that get blamed on the cultivar. A cutting can also be pushed too bright in the other direction, which shows as leaves that cup upward and look pale rather than yellow, a light-stress signature rather than a nitrogen one.
Vegetative Yellowing: Three Traps in a Fast Room
Vegetative plants are growing fast enough that they can afford to lose a leaf or two, which makes this the stage where real deficiencies and benign yellowing are hardest to separate by eye alone. Three traps account for most of it, and all three are worth ruling out before the element table is opened.
The first is transplant shock. Moving a plant into a larger pot tears fine roots, and for three to five days the plant cannot supply its oldest leaves, which yellow and may drop. The correct response is to hold the feed steady and keep the root zone warm, not to increase concentration, because the roots that would absorb the extra salts are the ones that were damaged.
The second is salt accumulation. In a fast vegetative room, irrigation water evaporates from the substrate surface and salts concentrate in the root zone between waterings. The plant then shows marginal yellowing and tip scorch while the reservoir reading looks perfect, because the problem is in the cube, not in the tank. Runoff EC compared against input EC is the measurement that separates this from a genuine shortage, and the gap widens the longer a pot goes between saturations.
The third trap is light at the bottom of the canopy, and it becomes the dominant cause the moment a vegetative canopy closes. Once the upper leaves intercept most of the incident light, the leaves twenty centimetres lower may be receiving a small fraction of the canopy-top figure, and a leaf that cannot pay its own carbon cost is retired by the plant. This is a density and penetration problem rather than a nutrition problem, and it is the same mechanism that reappears in flower with much more money at stake. For the element-by-element reading of what a vegetative deficiency actually looks like, our diagnostic guide carries the fourteen-element table and the pH and EC decision order; this page deliberately does not repeat it.
The Flip: Why the Daily Light Integral Drops a Third Overnight
The single most common cause of yellowing in the first ten days of flower is an arithmetic problem that nobody wrote down. When the timer moves from 18 hours to 12, the daily light integral falls by exactly one third if the dimmer is left alone, because the plant receives the same instantaneous intensity for a third fewer hours. In the worked example our PPFD and DLI guide uses, a late vegetative canopy at 500 µmol/m²/s on 18 hours receives 32.4 mol per day, and the same 500 µmol on 12 hours receives 21.6 mol. The plant loses 10.8 mol per day, a third of its budget, on the day the timer changes.
Plants respond to a light deficit the way they respond to any deficit: they mobilise stored nitrogen from the oldest leaves and ship it to the growing points. That is the yellow leaf at the bottom of the plant in week one of flower, and it is a light story wearing a nutrient costume. The fix is not a bloom booster. The fix is to raise the canopy intensity so the shorter day delivers a comparable integral: in the same example, 700 µmol on 12 hours returns 30.2 mol, which is close to the 32.4 the plant had before the flip.
The reason this matters commercially is that the response to the wrong diagnosis is expensive twice. Adding phosphorus and potassium at the flip does nothing about a light deficit, and it raises salinity in a root zone that is simultaneously adjusting to a new irrigation demand. The room then yellowing harder, the grower adds more, and the actual cause stays in place until the canopy thins enough that light reaches the lower leaves again. Check the before-and-after daily integral first, and only then look at the feed.
Early Flower: Yellow That Is Still the Flip
Weeks one to three of flower are still governed by the transition, and yellowing here usually has one of three causes: an uncompensated light drop, a feed that is still on the vegetative recipe, or a canopy that thickened faster than the light could penetrate.
The first is the arithmetic above. The second is a schedule problem: a vegetative formulation carries a higher nitrogen-to-potassium ratio than a flowering plant needs, and the plant responds by continuing to build leaf while the flower sites stall. The tell is that the yellowing is accompanied by soft, dark green new growth and slow flower initiation, rather than by pale new growth. The third is geometric: the stretch adds twenty to forty centimetres of canopy in two weeks, and the lower half of that new canopy is now shaded by the upper half. Our greenhouse and indoor layout guides both treat this as a spacing and penetration question, and it belongs here too, because the leaves that yellow are the ones that stopped being lit.
What does not belong here is a phosphorus or potassium booster. Flower sites in weeks one to three are still building structure, and peak potassium demand arrives later, once the buds begin to fill. Loading potassium early raises root-zone salinity at the exact moment the plant is extending its root system, which produces the marginal scorch that gets read as a deficiency and answered with more potassium. If the plants are yellowing in week two and the feed is already strong, the useful move is to measure the light at the height of the yellow leaf, not to strengthen the reservoir.
Mid-Flower: The Deficiencies That Are Real
Between roughly weeks four and seven, a yellow leaf on an older node with a clear pattern is worth taking seriously, because this is the stage where demand genuinely outruns supply. Three mobile elements and one immobile element account for most of it.
Potassium demand peaks as buds fill, and a shortage declares itself on older leaves, margins first: the saw-tooth serrations yellow, then brown, and the leaf curls. Magnesium shortage is the interveinal pattern on older leaves, yellow between the veins with the veins staying green. Nitrogen shortage is a uniform fade from the leaf tip inward on the lowest leaves, which is easy to confuse with the late-flower fade covered in the next section. Calcium is the immobile case: it shows on new growth as pale, distorted leaves with brown spots, and it is driven by transpiration rather than by concentration, which is why high-intensity LED rooms with tight vapour pressure deficits see it more often than the feed chart predicts.
Two non-nutritional causes deserve equal weight at this stage. The first is salinity: if runoff EC has climbed well above the input value, the plant is showing salt stress with a deficiency pattern, and adding feed makes it worse. The second is light at the bottom of the canopy, which in a dense flowering room can be a tenth of the canopy-top figure. A yellow leaf forty centimetres down in week six may simply be in the dark, and the correct response is defoliation, spacing or inter-canopy lighting rather than a stronger reservoir. Our light burn versus deficiency guide covers how to separate the two with a PPFD map and a runoff reading, and it is the right next page if the pattern is ambiguous.
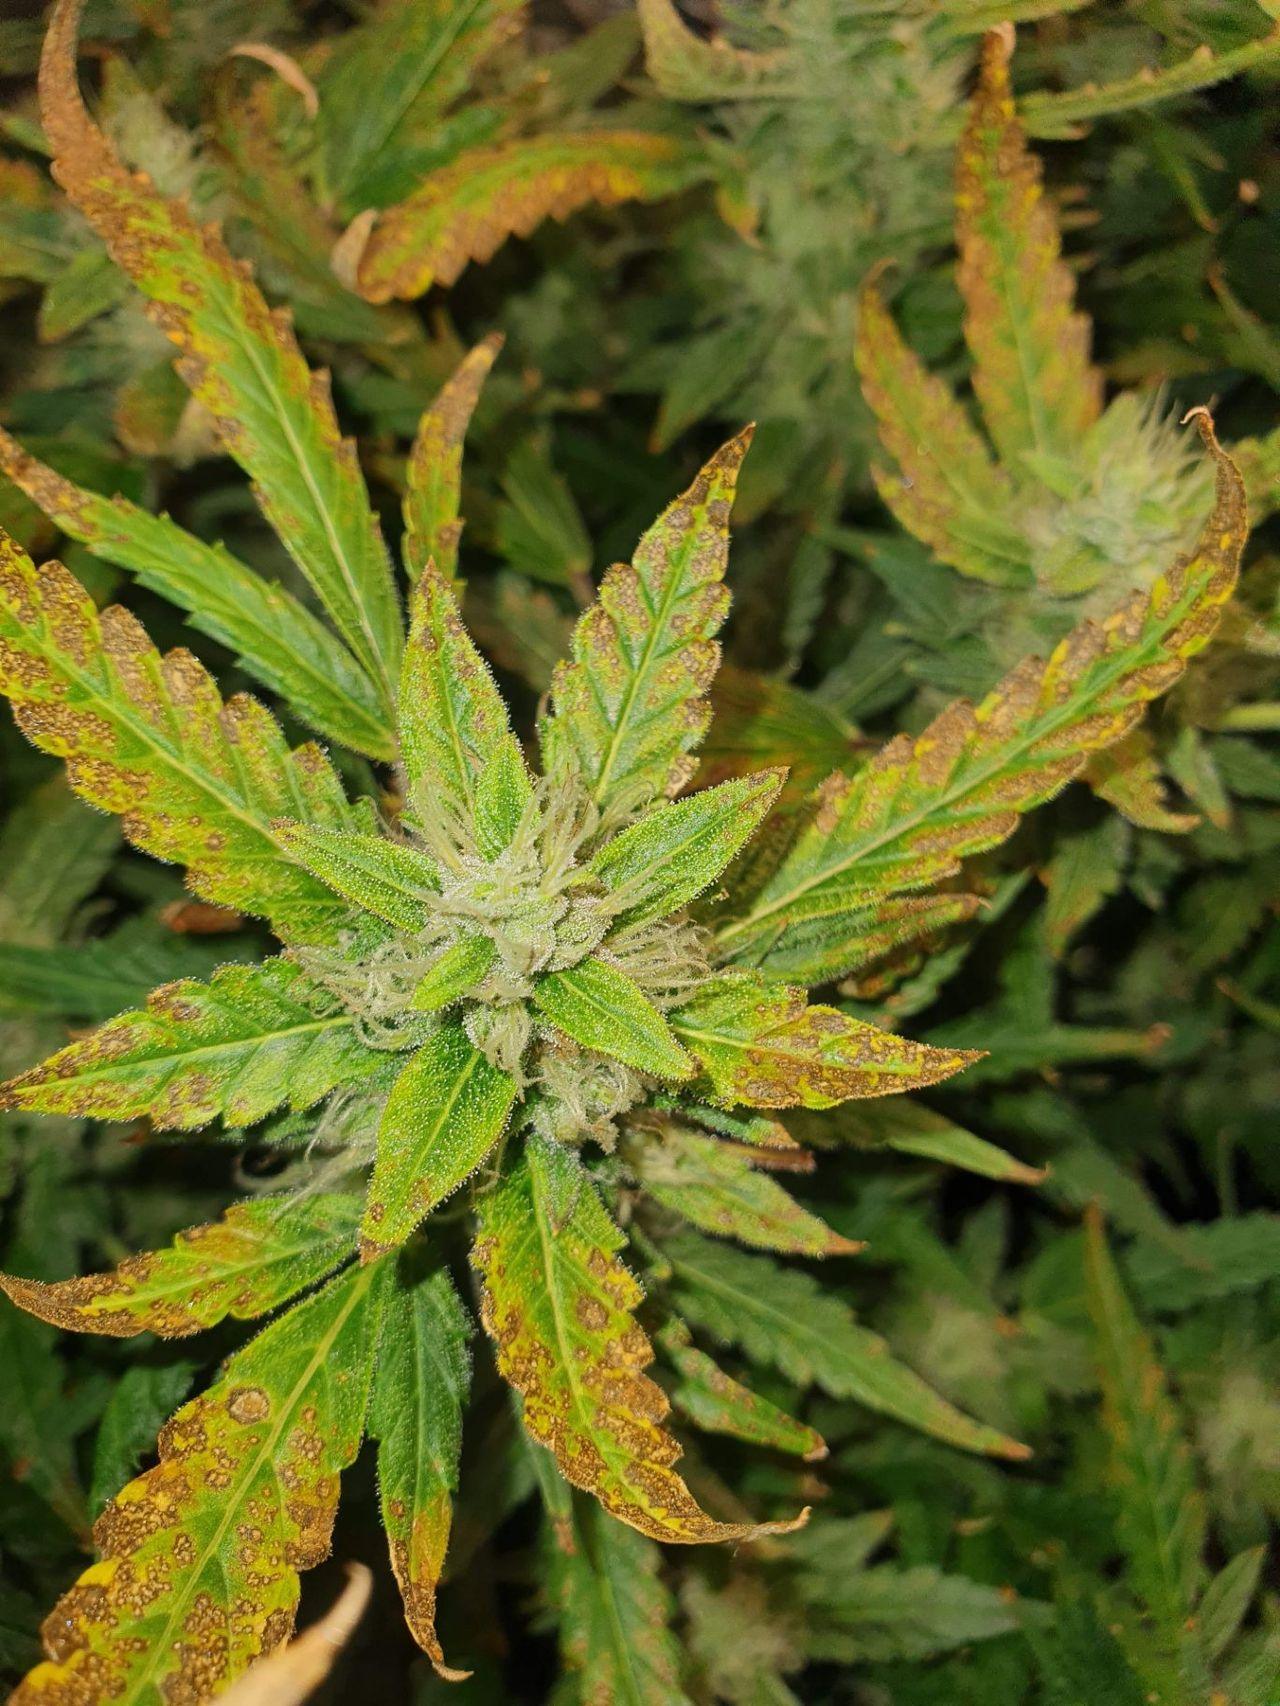
One habit makes mid-flower diagnosis much faster: sample by height, not by plant. Measure the light at the top of the canopy and at the height where the yellow leaves actually sit, and measure runoff EC from a pot in the affected zone rather than from the room average. A room that shows yellowing only in its lower third, with a clean top, has a penetration problem. A room that shows yellowing uniformly on its oldest leaves across every zone has a feed or root-zone problem. The two look similar in a photograph and require opposite responses.
Late Flower Fade: Telling Normal From Starvation
In the last two to three weeks a cannabis plant begins to senesce, and senescence is yellowing on purpose. Chlorophyll is broken down, the nitrogen it contains is exported to the flower sites, and the leaves that funded the canopy retire in reverse order of their contribution: lowest first, then upward, slowly, over two to three weeks. During a normal fade the buds keep adding weight, the pistils darken, and the trichomes move from clear through cloudy. Nothing needs to be done, and nothing should be.
Premature starvation wears the same colour and a different shape. It moves faster, it can start at the top rather than the bottom if the cause is root-zone failure, and most importantly the buds stop swelling while the leaves yellow. That combination, yellow plus stalled flowers, is the signal that the plant is short of something rather than finished with something. The distinction is not aesthetic: a fade that begins three weeks early costs filled weight, and a fade that is treated as starvation with heavy feed delays maturity and produces a leafy, slow-curing flower.
| Signal | Normal late-flower fade | Premature starvation |
|---|---|---|
| Direction | lowest leaves first, then one node at a time upward | can start at the top, or climb several nodes in a week |
| Speed | two to three weeks | days |
| Buds | still swelling | stalled or shrinking |
| Pistils and trichomes | darkening, clear turning cloudy | unchanged for the stage |
| Leaf condition | yellow, pliable, then drops cleanly | yellow with brown margins, spots or crisp tips |
| Correct response | nothing | find the root-zone or light cause |
The practical test is to photograph the canopy twice, seven days apart, and compare bud volume rather than leaf colour. If the buds are visibly larger and the yellowing has moved up one node, the plant is finishing. If the buds are the same size and the yellowing has moved up three nodes, the plant is failing. This is a more reliable reading than any single EC or pH number at this stage, because the plant's own allocation decision is the measurement.
Yellow Tips and Yellow Spots: Reading the Pattern Inside a Stage
Once the stage is known, the pattern on the leaf narrows the cause further, and two patterns generate most of the search traffic: yellow tips and yellow spots. They are different problems with different mechanisms, and confusing them sends growers in opposite directions.
Yellow tips are usually one of three things. Tip burn from salinity starts at the very point of the leaflet, is symmetrical across leaflets of the same age, and progresses from yellow to brown and brittle, often with marginal scorch on the same leaf; it is an excess, not a shortage, and the response is to lower concentration or increase runoff, not to feed. Nitrogen shortage also begins at the tip, but it is uniform and soft, moving inward as a broad pale band while the leaf stays pliable, and it appears on the oldest leaves first. And a yellow tip on leaves only at the top of the canopy, directly under a fixture, with the rest of the plant green, is a light or heat signature rather than a nutrient one, which our guide to light bleaching treats in detail.
Yellow spots are a different set. Calcium shortage produces brown spots inside pale new growth with curled margins, on young leaves, and it is the immobile pattern. Manganese produces interveinal yellow with tan dead spots inside the yellow, also on new growth. A fungal leaf spot such as Septoria produces irregular brown lesions with a yellow halo that enlarge and spread across the leaf over days, which no nutrient disorder does. And pest damage produces stippled pale dots with a insect visible on the underside if you look. The working rule: spots that spread and have a defined dead centre are biotic or necrotic; spots that stay the same size and sit inside a yellow field are nutritional.
Should You Remove Yellow Leaves?
The answer changes with the stage, and the reason is source and sink. A green leaf is a source: it produces more sugar than it consumes. A yellowing leaf is becoming a sink: it consumes sugar while producing little, until the plant withdraws its remaining nitrogen and lets it drop. Removing a leaf that is still a partial source takes energy away from the plant. Removing a leaf that has become a net sink and a disease surface saves the plant a small cost and improves airflow.
In seedling and clone stages, remove nothing. The cotyledons and the first true leaves are the plant's entire manufacturing base, and a cutting's older leaves are its rooting fund. In vegetative growth, remove only leaves that are fully yellow and detach with a light touch, because those have already been written off by the plant. In mid-flower, defoliation is a legitimate tool for light penetration, but it is a scheduled intervention rather than a response to colour: clear the lowest third that receives almost no light, in one pass, and avoid heavy defoliation in the three weeks after the flip, when the plant is rebuilding its canopy and its root system at the same time.
In late flower, remove nothing that is still attached. Those leaves are exporting nitrogen to the buds, and pulling them interrupts the process the plant is running. The exception is a leaf that is fully brown and hanging, which is already disconnected and is only a humidity and mould risk.
Does Flushing Cause Yellow, and Does It Matter?
Flushing, in the sense of feeding plain water for the final period, does turn leaves yellow, and that is the expected result rather than a side effect: with no nitrogen arriving, the plant funds the buds from its own leaves. The question worth asking is not whether the fade is normal but whether the timing is right, because the last two weeks are when buds add much of their weight.
The commercial trade-off is real and it is not settled by opinion. A flush that begins two to three weeks before harvest produces a pronounced fade and stops the plant's nitrogen supply while the flowers are still filling; a shorter flush in the final week produces a smaller fade and preserves more fill. If a buyer or a market requires a flushed product, the defensible position is to shorten the window rather than to start early, and to judge the result by bud weight and cure quality rather than by how yellow the canopy looks on the last day.
What is not defensible is using a flush to solve a yellowing problem that started in week three. A plant that is yellowing early for a light or root-zone reason will not be fixed by removing the feed, and the flush will simply remove the last input that was still working.
What to Measure at Each Stage
Measurements are only useful if they match the stage, and the most common waste of a grower's morning is running a full reservoir test on a problem that lives in the propagation tray. The table below sets out what is worth measuring in each window, what to ignore, and the reading that should trigger action.
| Stage | Measure this | Skip this | Reading that triggers action |
|---|---|---|---|
| Seedling | substrate temperature, cube weight, input EC | runoff EC, which is unreliable at this volume | input EC above roughly 1.5, or a cube that never lightens |
| Cutting | dome temperature, cube moisture, PPFD at tray top | reservoir EC | yellowing before callus, or PPFD outside 100 to 200 |
| Vegetative | runoff EC against input, PPFD at the top and mid-canopy | leaf colour charts | runoff well above input, or mid-canopy far below the top |
| Flip | DLI before the change and after it | the reservoir | a drop near one third, which needs dimmer compensation |
| Mid-flower | PPFD at the yellow leaf height, runoff EC, vapour pressure deficit | the calendar | lower canopy near or below 200 µmol/m²/s |
| Late flower | bud volume seven days apart, trichome colour | reservoir EC | buds flat while the yellowing climbs |
The general principle behind the table is that early stages are limited by the root zone and the environment, while later stages are limited by light delivery and by the plant's own allocation. A seedling has almost no root surface, so substrate temperature and cube moisture explain more than any nutrient concentration. A flowering plant has a large root system and a dense canopy, so the light reaching the height of the yellow leaf explains more than the reservoir does. Matching the instrument to the stage saves both money and time.
What Light Does at Each Stage
Light is the variable that changes meaning most across the cycle, and it is also the one most often held constant while everything else is adjusted. In propagation, light sets the shape of the plant: 200 to 300 µmol/m²/s on 18 to 24 hours for seedlings, 100 to 200 on 18 hours for cuttings, with a spectrum weighted toward blue and with far-red kept modest, because a high far-red fraction triggers the shade-avoidance stretch that growers then misread as a nitrogen problem.
In vegetative growth, the daily integral rather than the instantaneous intensity sets the internode length and the overall structure, which is why our DLI guide treats the integral as the budget and the photoperiod as merely the way the budget is delivered. In flower, the role splits in two: the intensity at the top of the canopy sets bud density, and the light that reaches the lower canopy determines whether the leaves down there stay green. A flowering room can be simultaneously over-lit at the top and under-lit at the bottom, and that room will show bleached tips and yellow lower leaves at the same time, which reads as two unrelated problems and is one.
This is why yellowing in flower is so often a lighting question in disguise. The stage sets the target, the target sets the schedule, and the geometry decides whether the target reaches the leaves that are yellowing. Our guides to how many fixtures a room needs and to arranging and scheduling greenhouse lights carry the layout arithmetic, and both are worth reading before the next cycle is planned rather than after the lower canopy has gone pale.
Five Stage Mistakes That Cost a Cycle
Feeding a stretched seedling. A pale, leggy seedling is short of light. Nitrogen makes it taller and softer, and the stretch compounds. Raise the intensity into the 200 to 300 band and keep the schedule at 18 hours or more.
Ignoring the flip arithmetic. The daily integral falls by a third when the photoperiod drops from 18 to 12 hours at unchanged intensity. Ten days later the lower leaves yellow and the grower blames the feed. Compensate at the dimmer on the day of the change.
Loading potassium in week two. Peak potassium demand arrives with bud fill, not with flower initiation. Early loading raises salinity while the root system is still extending, and the resulting marginal scorch gets answered with more potassium.
Treating lower-canopy yellow as hunger. In a dense room, the leaves forty centimetres down may be receiving a small fraction of the canopy-top light. The fix is penetration, spacing or defoliation, and a stronger reservoir does nothing except raise EC.
Fighting the late fade. A slow bottom-up fade in the final two to three weeks, with buds still swelling, is the plant finishing. Feeding through it delays maturity and produces a leafier flower, and the cost is paid at harvest rather than at the reservoir.
Frequently Asked Questions
Why are my cannabis leaves turning yellow?
Start with the age of the plant rather than the colour of the leaf. Seedlings that yellow usually have a cold, wet or over-fed root zone and should not be fed. Cuttings that yellow from the bottom in their second week are funding root growth normally. Plants in the first ten days after the flip have lost about a third of their daily light integral because the photoperiod dropped from 18 hours to 12. Plants in their final two to three weeks are senescing on purpose. Only mid-flower yellowing on older leaves with a clear pattern usually calls for a feed change.
Why are my cannabis seedling leaves turning yellow?
Yellow cotyledons on a seedling whose first true leaves are green are normal, because the seed reserve is being retired after seven to fourteen days. Yellowing on the first true leaves with a short plant points at the root zone: a pre-charged cube plus a light feed plus high input EC can burn root tips, and a cube that never dries back suffocates them. Pale rather than yellow leaves on a stretched stem are a light shortage, so raise the intensity into the 200 to 300 µmol/m²/s band before changing the feed.
Is it normal for cotyledons to turn yellow and fall off?
Yes. The two rounded seed leaves are a stored food reserve, not a photosynthetic surface, and they are designed to be retired once the first true leaves can support the plant. The usual window is day seven to day fourteen above the cube. A seedling that loses its cotyledons while its true leaves are green and opening is developing on schedule, and feeding it at that moment is more likely to burn the root tips than to help.
Why are my weed leaves turning yellow during flowering?
The week of flower decides the answer. In the first ten days the most common cause is the photoperiod change: 18 hours to 12 hours at unchanged intensity cuts the daily light integral by a third, and the plant funds the gap from its oldest leaves. Between weeks four and seven a genuine potassium, magnesium or calcium shortage becomes plausible, and runoff EC against input EC separates that from salt stress. In the last two to three weeks the fade is senescence, and the test is whether the buds are still swelling.
Is it normal for cannabis leaves to turn yellow in late flower?
Yes, when three conditions hold: the fade moves slowly from the lowest leaves upward over two to three weeks, the buds keep adding weight, and harvest is roughly two to three weeks away. That is senescence, and the plant is exporting nitrogen from those leaves into the flowers. If the yellowing arrives three weeks early, moves from the top down, or coincides with buds that have stopped swelling, it is starvation rather than a fade and the cause is usually in the root zone.
Should I remove yellow leaves during flowering?
Remove leaves that are fully yellow and detach with a light touch, because the plant has already written them off. Do not strip leaves that are still partly green in late flower, since they are exporting nitrogen to the buds. For light penetration in mid-flower, treat defoliation as a scheduled pass on the lowest third rather than a reaction to colour, and avoid heavy defoliation in the three weeks after the flip while the canopy and root system are rebuilding together.
What are the common causes of yellow tips on weed leaves?
Three causes cover most cases. Tip burn from salinity begins at the very point of the leaflet, is symmetrical across leaflets of the same age, and turns brown and brittle, often with marginal scorch, which means excess rather than shortage. Nitrogen shortage also starts at the tip but stays soft and uniform, moving inward as a broad pale band on the oldest leaves. A yellow tip confined to leaves directly under a fixture, with the rest of the plant green, is a light or heat signature and is fixed at the dimmer or the hanging height.
What causes yellow spots on weed leaves?
Calcium shortage produces brown spots inside pale, distorted new growth, because calcium is immobile and travels with transpiration. Manganese produces interveinal yellow with tan dead spots inside the yellow, also on young leaves. A fungal leaf spot such as Septoria produces irregular brown lesions with a yellow halo that enlarge and spread over days, which no nutrient disorder does. The working rule is that spreading spots with a defined dead centre are biotic, while spots that stay the same size inside a yellow field are nutritional.
Do clones turn yellow before they root?
Often, and usually on schedule. A cutting has no roots to take up nutrients but still respires and transpires, so it funds itself from stored reserves, and the most mobile reserve is nitrogen in the older leaves. Yellowing that starts at the bottom around day seven to ten and reverses once roots appear is normal. Heavy yellowing at day three, before any callus has formed, points at the propagation environment: an over-warm dome, a saturated cube, a rotting cut surface, or light far above the 100 to 200 µmol/m²/s band.
Does flushing turn cannabis leaves yellow?
Yes, and that is the expected result rather than a fault: with no nitrogen arriving, the plant funds the buds from its own leaves. The decision worth making is timing, because the final two weeks are when buds add much of their weight. A short flush in the last week preserves more fill than a three-week flush, so if a market requires a flushed product, shorten the window rather than starting early. A flush will not fix yellowing that began in week three for a light or root-zone reason.
Can too much light turn seedlings yellow?
Excessive light usually produces pale, upward-cupping leaves rather than true yellowing, and it can bleach tissue directly under the fixture while the rest of the plant stays green. The more common light problem in propagation is the opposite one: too little light produces a stretched stem and pale, thin leaves that growers misread as a nitrogen shortage. Seedlings do best in the 200 to 300 µmol/m²/s band on 18 to 24 hours, and cuttings in the 100 to 200 band on 18 hours.
Should I feed more when leaves turn yellow in flower?
Only when the pattern supports it. Yellowing on older leaves, arriving over one to three weeks, with an interveinal or marginal pattern, in weeks four to seven of flower, is the case where a feed change is justified, and potassium, magnesium and calcium are the usual candidates. Yellowing in the first ten days after the flip is a light-integral problem, yellowing in the lower canopy of a dense room is a penetration problem, and yellowing in the final weeks is senescence. In all three of those cases, more feed raises salinity without addressing the cause.